| Exploring Edison - In C |
| Written by Harry Fairhead | ||||
| Friday, 03 July 2015 | ||||
Page 2 of 3
Remote SystemsAt the bottom of the work areas you will see a Remote Systems tab. This is where the connections to the Edison and other machines are stored. If you click on the tab you should see the connection you created as part of the new project.
If you right-click on the connection Edison WiFi you can select properties and edit its name, IP address etc. One thing you often have to change is the Default User Id which generally defaults to the name of the host user not the Edison user:
You can right click on any of the sub-items under the connection and select the connect option. You can use the Sftp connection to work with the Edison's file system. To check that you have a connection the simplest thing to do is right click on the Ssh terminals icon and select launch terminal. After you supply a password you should be able to use the terminal to work with Yocto Linux in the usual way.
If you can't connect to the Edison via a terminal you won't be able to compile and run a program. So if it doesn't work you need to debug the connection before moving on. The only possibilities are that the Edison is setup for WiFi, you have the wrong IP address or you didn't set a password and so SSH isn't enabled on all ports. The ProgramNow that we have a connection that works it is time to move to look at the program. One of the big problems with using the Eclipse IDE is that the templates for the programs are limited, generally in C++ rather than C and specialized to the Arduino breakout board or some other device. For example at the start of the template a test is made to see which device is being used. Of course as we are targeting the Edison with the mini-breakout board this is redundant code as far as we are concerned. If you want to write C for the mini-breakout board then the simplest thing to do is use the LED C template, then delete most of the code and start afresh. The key to programming the Edison's GPIO lines is the mraa library which is a low level interface to the hardware. The procedure to make sure you have the latest copy of the library was described in First Contact, but all you have to do is copy and paste the following at the Linux command prompt:
We will look at the details of mraa in the next chapter, but for the moment all you need to know is that to use it you have to include its header file at the start of the program:
The steps in using mraa are fairly standard for the mini-breakout board. First you have to initialize the pin you want to use:
We are using pin 13 and pin numbering is explained in detail later. You can include an initialization of mraa if you want to, but strictly speaking it is unnecessary because the function is called when the module is loaded:
We next need to set it to be an input or an output - an output in this case:
Following this we can set it high using:
and low using:
Putting all this together the complete program we need to enter is:
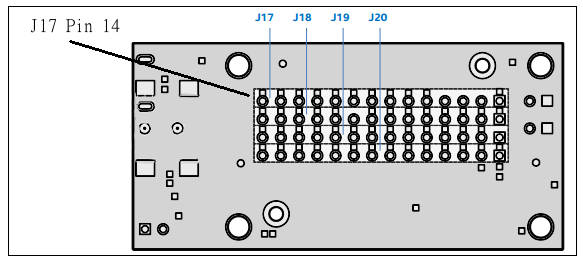
The for loop for(;;){..} provides us with a simple idiom for an infinite loop. The sleep(n) function delays execution for n seconds. Hence the program toggles pin 13 high and low every second. As there is no LED connected to pin 13 you can test this using a multimeter, an oscilloscope or a logic analyser. Gpio line 13 is J17 pin 14 on the mini-breakout board - see diagram below:
To run the program simply select the Run icon (green triangle) at the top of the work area, hit Ctrl-F11 or use the Run,Run menu item. The program will be compiled, downloaded to the Edison and run. You should see the voltage varying on the pin. If you have a compilation error, check the program, correct the error and try again. If you have an error that says that the program couldn't be downloaded then the chances are that the Run configuration is using the wrong connection. Use the command Run,Run Configuration and make sure that the Connection field is showing the correct connection to the Edison - the one you tested in the previous section.
To check the running of the program you can select the Console tab at the bottom of the work area. You should use the red square icon to stop the program before trying to run it again after making any changes.
If you forget to stop the program running before you try running it again, you will discover that while it will compile it won't upload. You will see the error message something like:
Note: the project/program is called LED in this case.
The solution to the problem is to launch a terminal: right-click on Ssh Terminal in the Remote Systems tab and select Launch. Switch to the terminal tab, i.e the terminal that you have just launched, and use the ps command to get a list of running processes:
Somewhere in the list will be a process corresponding to /tmp/LED or more generally /tmp/projectname. Take note of the Process ID PID on the far left - 689 in this case and enter the command:
or the kill PID corresponding to your program. This stops your program running and following this you can re-run it in the usual way. Notice that what happens when you run a remote program is that Eclipse uploads the complied executable file to a the directory /tmp and then runs it. You can change the directory and file name that is used in the Run Configuration.
Also notice that you can enter commands to run before your program is run - in this case the chmod simply sets execute permission on the file so that it can be run. |
||||
| Last Updated ( Thursday, 12 May 2016 ) |