|
Page 1 of 4 jQuery does forms - who would have guessed! Using it is a good way to tame this sometimes difficult HTML/JavaScript feature.
This is an extract from my book Just jQuery The Core UI.
Available as a Book:
buy from Amazon
- Understanding jQuery
- Basic jQuery CSS Selectors
Extract: The DOM
- More Selectors
Extract: Basic Selectors
- The JQuery Object
- Filters
- DOM Traversal Filters
- Modifying DOM Objects
Extract: Modifying The DOM
- Creating Objects & Modifying The DOM Hierarchy
- Working With Data
Extract: Data ***NEW!!!
- Forms
- Function Queues
- Animation
- jQuery UI
- jQuery UI Custom Control
- Easy Plugins
- Testing With QUnit
- Epilog A Bonus Function
Also Available:
buy from Amazon
Forms
Forms are a special part of the HTML UI because they provide a way to get data back to the server. You can get data back to the server with Ajax, but Forms are still a good way to work. jQuery helps make it easier and more flexible to use forms.
Back in the days before HTML5, forms really were the only UI HTML had – the rest was just text and layout. Today you can build a UI using HTML5 without using a form of any sort, but they are still a useful way to collect data and get it back to the server.
The <form> Element
Forms are collections of controls like buttons and input controls. In the early days of HTML these controls were intended only to appear as child elements of a form but in HTML5 this isn't the case. As a result it is perfectly possible to create what looks like a form without there being any sign of a <form> tag or parent Form Element.
The main purpose of a <form> tag is to specify what is to happen to the data collected by the controls it contains. It does this using two attributes, action and method. The action attribute specifies the URL where the data will be sent and the method is usually either post or get and specifies how the data is sent to the server.
It is important to understand that the <form> doesn't just send data to the server, it implements a full get or post request which results in a web page being sent back to the client. That is, the URL specified determines the next page that the user sees.
For example:
<form action="mypage.html" method="get">
</form>
specifies that an HTTP get is performed and the next page to be loaded is mypage.html.
The next question is what triggers the form to actually get the next page?
The answer is that a submit event has to be triggered on the form element. When the form handles the event it automatically gathers all the data in the form and sends it to the server as part of the request for the next page.
There are a number of ways of triggering a submit event but the most common is to include a submit button within the form. For example:
<form action="mypage.html" method="get">
 <button type="submit">Submit</button>
</form>
If you click the submit button then the submit event is triggered on the parent form element and it gathers the data and performs a get for mypage.html which will load and replace the page that the form is on. If you put an HTML file called mypage.html in the root of the website you will see it load when you click the button.
The user can also trigger a submit event by entering a return in a text field, but this is browser dependent.
The next question is, what sort of data can the form collect and how does it send it to the server?
There are various input controls that you can use. HTML5 expanded the possible range by quite a lot and if you can assume that the client is HTML5 capable then you can create much better forms. However, the basic controls are good enough for many purposes.
In HTML the main form element is the <input type= "type"> where type is any of:
- text – text input box
- password – password input box uses asterisks to mask entry
- file upload – enter a file name.
- radio – a radio button grouped by name attribute
- checkbox – a single ticked or unticked checkbox
- button – a standard button
- image – a standard button with an image background
- submit – a submit button which triggers a submit event
- reset – a reset button which resets the form elements to their defaults
There are also special input tags:
- textarea – a multiline input box
- select box – a dropdown list
The key idea is that every input element has a name and a value attribute. These define the name/value pairs that the form collects and sends to the server. The value attribute is used to set the initial value of the input element and it is also used if the form is reset.
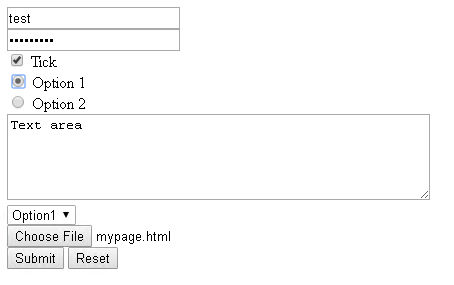
Consider this basic form that uses all of the above input elements:
<form action="mypage.html" method="get">
 <input type="text" name="username"/><br/>
 <input type="password" name="password" /><br/>
 <input type="checkbox" name="maths" value="on" />
 Tick<br/>
 <input type="radio" name="group1" value="option1"/>
 Option 1<br/>
 <input type="radio" name="group1" value="option2"/>
 Option 2<br/>
 <textarea rows="5" cols="50" name="description">
  Text area
 </textarea> <br/>
 <select name="dropdown">
  <option value="Option1" selected>Option1</option>
  <option value="Option2">Option2</option>
 </select><br/>
 <input type="file" name="fileupload"
                          accept="image/*" /><br/>
 <input type="submit" />
 <input type="reset">
</form>
It creates the following form:
|