| Getting started with App Inventor 2 |
| Written by Mike James | ||||
| Thursday, 18 December 2025 | ||||
Page 3 of 3
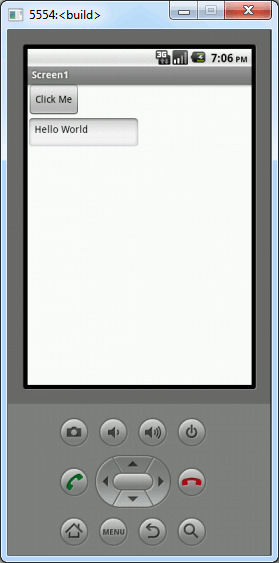
USB CableIf you want to connect using a USB cable then you have to install the AI2 Companion app on the real device as for the WiFi connection. The only difference is that you have to install a USB driver on your desktop machine and these are not available for all Android phones. Check: http://appinventor.mit.edu/explore/content/windows-drivers.html to see if your device is supported. This will only work if your Phone has a suitable USB driver install and you have set the phone to USB Debugging and Stay Awake using the Applications, Development menu in Settings. If the USB device driver isn't included with the App Inventor then you can usually get it from the phone manufacturers website. It is also installed if you make use of any synchronizing or phone management software that comes with the phone. The device must also have an SD card installed to work. You can find more information on the App Inventor web site. EmulatorAn alternative that always works is to download the emulator. This is a two step process. First you have to download the MIT App Inventor Tools installer: http://appinv.us/aisetup_windows and run it. This includes the emulator and it will set everything up for you. You might get a warning about the software not being downloaded often and hence being dangerous - but it is safe to continue. Once the tools are installed, you need to run aiStarter. Then you can simply go to the Connect menu and select Emulator. This will then prompt you do do various other things that install the AI2 Companion on the emulator and update the software. This only has to be done once. Then repeat the connection by selecting Connect, Reset and then Connect,Emulator. It takes a while for the emulator to start so be patient. It also takes time for you app to be loaded to the emulator so again be patient. Eventually you will see you app loaded an if you click on the button you will see Hello World appear in the text box.
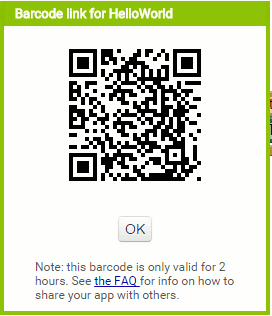
The emulator is very accurate and you even have to unlock the the phone in the usual way before you can use it. It really is this easy and simple. If you want to modify the program then just go to the Blocks editor or the Designer and make the changes you want to make. The app running on any of the Android devices connected to the App Inventor will be automatically updated. You can see the results of your changes at once. Installing An App From The App Inventor SiteThere is another way to get an app onto a real phone. It isn't as interactive as other methods but it is sometimes useful if you want to demo your app to another persons phone. Return to the App Inventor window and click on Build, App (provide QR code). When the barcode appears hold your phone up to the screen and using a barcode scanning app (there are a number of free ones) scan the code. This takes your phone to the App Inventor site and if you log in with the same Google account you used to create the app it will be automatically downloaded to the phone. Notice that the QR code is only valid for 2 hours.
There is also a final very crude way to get your Android apps running. You can opt to download the app to the desktop computer as an APK file. You can then copy this file directly to a phone's SD card via a standard USB cable - in this case no driver is required. Where Next?From here using App Inventor is a matter of exploring what UI components you have to create the look of your app and what blocks to give it the behavior you want. It isn't difficult but sometimes it can be a challenge to find what you are looking for. It is also worth knowing that this sort of approach to creating programs, i.e. using blocks isn't unique to App Inventor - see the Scratch programming language for example. Far from being just something educational App Inventor has enough power to allow you to build a wide range of apps. It's a serious design tool - that also just happens to be a whole lot of fun. Look out for further explorations of the App Inventor in future articles on I Programmer. More InformationRelated ArticlesApp Inventor 2 (Book Review) App Inventor: Create Your Own Android Apps (Book Review)A Programmers Guide To Languages
Contents
To be informed about new articles on I Programmer, sign up for our weekly newsletter, subscribe to the RSS feed and follow us on Facebook or Linkedin.
Comments
or email your comment to: comments@i-programmer.info |
||||
| Last Updated ( Tuesday, 23 December 2025 ) |