| Getting Started with Google Earth |
| Written by Ian Elliot | |||||||
| Tuesday, 08 July 2014 | |||||||
Page 3 of 3
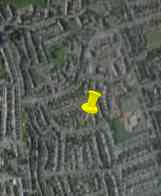
PlacemarksMoving on from simply panning, zooming and generally controlling the map view it is also possible to add pushpin markers by using Placemark objects. As always this is just a matter of creating a Placemark object and customising it using its properties. The only new technique is adding the Placemark object to the Earth object's features collection. For example, to place a pushpin at the location (55,-1.5) you would first create the Placemark object
Next we have to create a Point object to use to initialise the position of the place mark:
The point object has Latitude and Longitude properties which we can set
Finally we set the Placemark's Geometry property to the point and then add the Placemark to the Earth object;s Feature collection:
There are lots of other properties you can set to customise the Placemark further but its setting its Geometry property to a point location is the minimum work you can do and it creates a default "pushpin" marker at the location. Notice that the map doesn't automatically pan to the new Placemark. - in many cases you don't want to view a push pin you have just created. To view the Placemark you can either pan the map manually using the mouse to the location or you can use the LookAt object method we discussed earlier. For example, putting the Placemark and the LookAt example together we have:
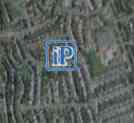
You can use a custom graphic for the push pinshapes. All you have to do is create a custom icon object and set its Href property to the URL of the graphics file:
Next you have to create a style object and add the icon to it.
Finally you add the Style object to the Placemark:
Now when the Placemark is added to Earth the custom icon will display.
The reason for using a two stage process to add an icon is that a custom icon is just one of the many things a Style object can control. In general if you want to change or add to the look of a Placemark then you have to add something to its Style object. In principle you can specify a local file to act as the the custom icon but in principle this is difficult. The file path can't include spaces and security restriction tend to block the loading of the graphic even if you do manage to enter a valid path. Going FurtherWorking with the Earth API is just a matter of figuring out which objects methods and properties affect the feature you are trying to control. My advice is to read through the object, methods and properties of the Earth API and investigate any of the methods and properties that interest you. Often this will involve finding out how some auxiliary object works that is used as a parameter in the method. For example to add the usual navigation controls to the map you would use:
There are also graphical layers that determine what is displayed in a single on/off action. For example to turn the road map on you would use:
Also notice that the entire Google Earth API is structured around the use of a "layout" language called KML. This can be used to describe the features you want to add to the map without using any code. The advantage of KML is that it can be read into both Earth and Maps. For more information see - KML in Google Maps and Earth
More Informationhttps://developers.google.com/earth/
Related ArticlesGetting started with Google Maps JavaScript An Interactive Google Earth KML Editor Getting started wth Bing Maps (Virtual Earth) Where are you from? IP Geolocation
To be informed about new articles on I Programmer, install the I Programmer Toolbar, subscribe to the RSS feed, follow us on, Twitter, Facebook, Google+ or Linkedin, or sign up for our weekly newsletter.
Comments
or email your comment to: comments@i-programmer.info
<ASIN:1846288266> <ASIN:1590597079> <ASIN:0321525590> <ASIN:1934356069> |
|||||||
| Last Updated ( Tuesday, 08 July 2014 ) |