| Getting To Know WPF |
| Written by Mike James | ||||||
| Thursday, 26 September 2019 | ||||||
Page 2 of 5
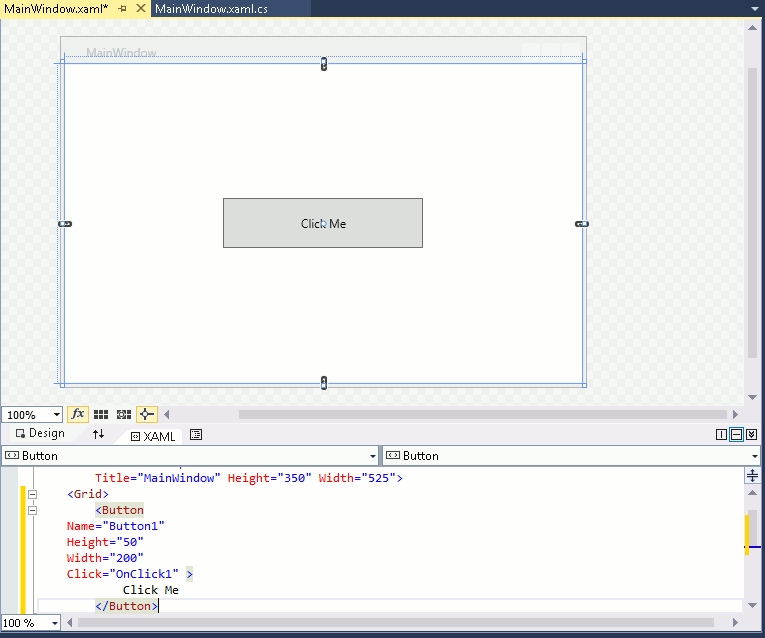
Hand Coding XAMLWith the MainWindow.xaml file select, select the XAML tab and between the <Grid> and </Grid> tags add the following: <Button This is the XAML markup for a button called Button1, at the specified size and at a default location (the centre of the form). A click event handler is also defined as OnClick1 and the initial content i.e. the button’s label is set to “Click Me”. As the designer renders any XAML you enter directly you will be able to see the button you have just defined in the pane above.
The button and the XAML
Now if you select the code page and enter: void OnClick1(object sender, Notice that the code “knows” the name of the button that you have defined using XAML and the connection is made automatically that this OnClick function is indeed the event handler you specified in the XAML. The method has to be included in the MainWindow partial class. When you first encounter this automatic connection between the XAML markup and the code it feels odd - as if there is more going on behind the scenes than you can see. Later you simply accept it and make use of it. 
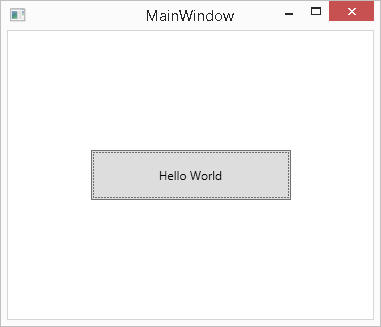
Now if you run the program you will see a button in the middle of the form inviting you to click it and when you do it will say “Hello World”.
Your first WPF application
Why WPF?There are lots of reasons why WPF is a second generation GUI and one of the most important is that it makes use of the modern video hardware nearly all machines have.
The Windows Forms API was invented in the days when graphics cards were simple and it makes very little use of hardware graphics acceleration. WPF, on the other hand, uses the DirectX rendering engine and this does make use of graphics acceleration. It also means that WPF has access to a wide range of visual effects for full 3D presentation, including meshes, materials, lights, textures and so on. Yes, WPF provides you with yet another way of creating 3D graphics under Windows. Unfortunately this often doesn't go far enough for many uses. At a more mundane level all of the elements of any UI you create using WPF are rendered using vector graphics, rather than bitmaps, and this means that they display at the highest resolution the display device supports. It is also a “retained” mode graphics system which makes anything you draw on a form persistent without you having to redraw it. For example, if you draw a line on a form and the form is minimised the line is still there when the form is restored and you don’t have to redraw it. Retained mode allows the graphics system to optimise the display process. WPF also implements a better and more sophisticated event system. It also supports UI features that make it easier to implement advanced architecture like MVC. In particular WPF supports data binding which will automatically display and update data bound to UI controls. The most obvious feature of WPF is XAML and it is worth pointing out that even though XAML is central to the way most people use WPF you can have WPF without XAML. Given XAML has gone off and got a life of its own it is also true that you can have XAML without WPF. WPF Without XAMLIt is a much over looked fact that if you don’t want to use XAML then you don’t have to. There are still .NET classes for each and every WPF component that you care to use. For example as well as there being a <Button> tag there is a Button class within the framework (not to be confused with the Windows Forms Button class). In fact there has to be a framework class for everything in XAML because XAML is just an object creator and initialisation language - see Chapter 2. XAML is always converted to framework objects, properties and methods. What this means is that, if we want to, we can create the same objects and work with their properties and methods without any XAML. If you want to code our first example using minimal XAML you can first delete the grid tags and everything between them and then enter the following code in the code page within the MainWindow class definition: public partial class MainWindow : Window
{
public Button Button1;
public MainWindow()
{
Grid g = new Grid();
Button1 = new Button();
Button1.Height = 50;
Button1.Width = 200;
Button1.Content = "Click Me";
Button1.Click += OnClick1;
g.Children.Add(Button1);
this.Content = g;
InitializeComponent();
}
void OnClick1(object sender,
RoutedEventArgs e)
{
Button1.Content = "Hello World";
}
}
It looks more complicated and it’s longer but you should be able to see that it does the same job as the XAML by creating objects and setting their properties. So use XAML or don’t use XAML, the end result is the same. In the rest of this chapter the focus will be on using XAML but converting any of the examples into pure code is relatively easy. It is also useful to know how to work with the UI in code as well as within the markup. |
||||||
| Last Updated ( Thursday, 26 September 2019 ) |