| The Insider's Guide to the Java Web Developer Nanodegree - 4 |
| Written by Nikos Vaggalis | |||
| Monday, 21 September 2020 | |||
Page 2 of 2
Lesson 3: Java Persistence API covers JPA's core concepts:
The most important of that list has to be the Entity Manager. It is the part that does the actual work with the database. Its actions are:
For instance :
//write p to the database //will update database
//retrieve an instance by its key // will update database Basically the EntityManager does CRUD, but also does querying too with JPQL, a SQL-like language that works on objects handled by the manager rather than tables handled by the database. For example: SQL JPQL Fortunately all that is simplified with the use of Spring's extension to JPA, Spring Data JPA and the Repository pattern it implements. It's a pattern which we've been using all along in extending the CrudeRepository interface to take care of our CRUD operations seamlessly.Under this scheme each entity has its own repository and makes our life much easier. Using it makes the manual work required with the EntityManager not necessary anymore; you just tell Spring to handle everything. For instance, to persist an object, you've got to just call :
As far as querying the database goes, we find out that Spring has a magnificent feature called derived queries which take away all the boilerplate of the JPQL and in a declarative way tells the database what to do :
You write that and Spring translates it to a native sql query behind the scenes. Marvelous! This makes it even easier to get started without much knowledge in SQL.You just have got to express your intentions as succinctly as possible. This, and the previous lesson, had lot of material to digest. To get through it I suggest using the lessons' exercises as your guide. Pay attention to them and their solutions; they'll clear up many things. Lesson 4: Connecting to Data Sources comes as a welcome break from the exhausting previous ones. It's lightweight, easy to follow and practical and covers how to set up your database, use credentials, create your datasources and connect to them with their connection strings. It's here where we break away from the H2 DBMS we've been using so far and now start to use a MySQL database. We learn how to set it up, how to connect to it and what to put in the project's applications.properties. For instance, this property allows you to customize Hibernate’s initialization behavior: spring.jpa.hibernate.ddl-auto = ? Available choices : create: Drop all tables for defined Entities, then create them. Or spring.jpa.show-sql=true Under a Plant with Delivery entities exercise, we update our application.properties to always initialize the datasource and set it to create tables on startup. Next, we set the properties to show and format sql. Running our application again, we can check out the execution of the create statements in our console. Furthermore we use the MySQL Workbench to and verify that all the tables have been created. Finally in this part there is Lesson 5: Persistence Without JPA. "I've learned all about JPA to now forget all about it? The point is that you might in some environments, or job requirements, not to be able to use JPA. So you've got to play along with the alternatives as JPA is not the only option for persistence.In fact many devs refuse to use an ORM; I was one of them before this course. I thought that the process of creating entities, mapping PK's and relationships in code would be too cumbersome. I preferred to start the other way around; be given a database schema to generate the entities and their relationships, especially since MySQL is used as it provides a very nice Workbench where you can design your ERD. In fact, after completing this course, I'll be looking to go database first and start from the schema to generate the code. Fortunately there are dedicated tools for that too: Hibernate tools for reverse engineering . I was of the ones, keep finding myself despite trying for the opposite to ponder on the usefulness of the ORM. It looked to more convoluted to me than going straight up SQL when you know your model well. But I had to bite the bullet because Hibernate is an industry-wide standard used in most enterprises and software houses. It's one of the reasons I took this course after all, to learn about the ORM way of doing things. So this lesson is targeted at such naysayers, or those looking to contrast the merits of both ways and those that are limited to the "old" ways and can't do otherwise. Specifically this lesson is about creating your DAL (Data Layer Access) without JPA. This includes creating your schema from SQL. In the first task we have to:
Long id
insert ignore into candy
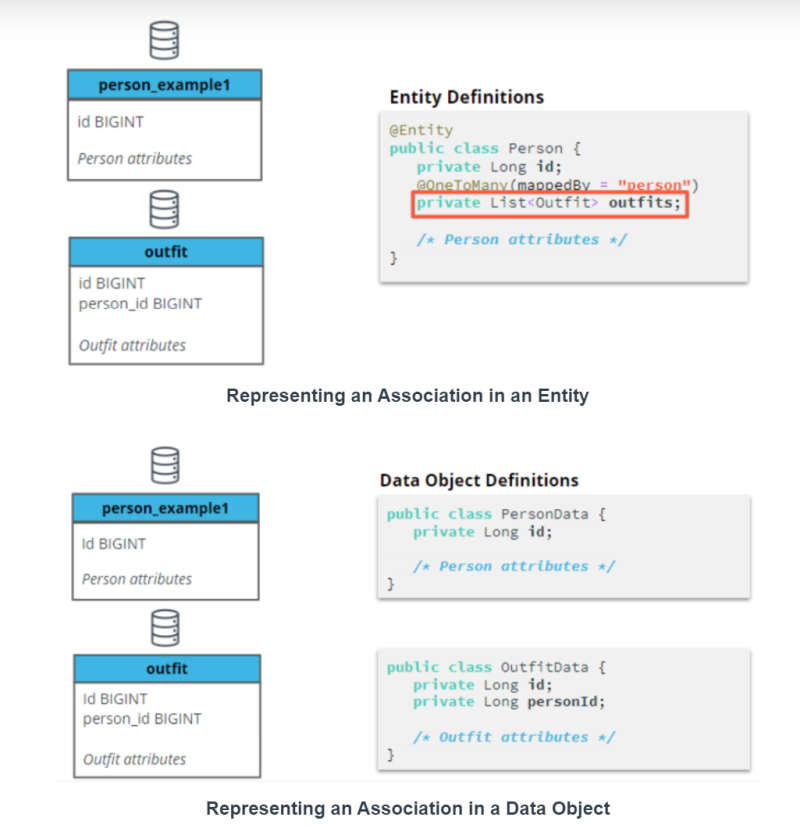
Also, since we won't be using the Repository pattern and we go pure SQL DAL we have to write our own DAOs (Data Access Objects) to map the objects to their database tables, the equivalent of what Entities did under the Repository.
What this demonstrated is that going with the DAO pattern was more involved and "flat" than going with the Repository pattern. Whereas a Repository presents a collection of Entities that you modify to update the database, a DAO provides methods that expose various actions, along with standard CRUD operations. You also have to manage the relationships manually and do multiple SQL queries in order to load related objects. We're looking at much more code. I've started missing Hibernate handling things already. To do all the persistence we use JdbcTemplate, which functions like the EntityManager: it provides connections, executes queries, and manages transactions, but in a raw way. Finding data ?
No more - just a simple: Inserting data?
No more - just a simple: More complex queries ? So, there's a lot of convenience lost by not going JPA. The benefits of going JdbcTemplate are in terms of performance and the total control you have over your queries; but at cost of writing much more code. If you ask me which I prefer now that I've experienced both ways, I'll say the Hibernate way by a great margin! Yes, I'm a convert! By the end, after so much material to assimilate, I was looking for a practical use case that would bring all this together. And what better way of doing that than by getting involved with a hands-on fully fledged project? That's the next step after finishing the lesson; doing the final exercise Project Critter Chronologer, a Software as a Service application that provides a scheduling interface for a small business that takes care of animals.This Spring Boot project allow users to create pets, owners, and employees, and then schedule events for employees to provide services for pets. It involved: Task 1: Configure Properties While you could choose any of the persistence strategies discussed in this course, meaning that you could use a JdbcTemplate to execute native queries, Hibernate and EntityManager, or use Spring Data JPA. Regardless of the approach, we had to encapsulate the persistence logic inside our Data layer. I opted for Spring Data JPA and reflecting back after completing the project, I really had made the correct choice. During the project, I:
and so on. I can say with a great degree of confidence that I've nailed JPA. Thanks to Udacity, I've not just learned about this state-of-the-art technology but have also learned the correct ways of structuring my application in such a way as to be maintainable, decoupled and logical. Next stop is "Security and DevOps".
More InformationRelated ArticlesThe Insider's Guide to the Java Web Developer Nanodegree - 1 The Insider's Guide to the Java Web Developer Nanodegree - 2 The Insider's Guide to the Java Web Developer Nanodegree - 3 To be informed about new articles on I Programmer, sign up for our weekly newsletter, subscribe to the RSS feed and follow us on Twitter, Facebook or Linkedin.
Comments
or email your comment to: comments@i-programmer.info |
|||
| Last Updated ( Monday, 21 September 2020 ) |


