The UI thread creates the UI and to avoid problems of synchronization only the UI thread can interact with the UI. That is, only the UI thread can access the UI. This is a fairly common approach to implementing a UI and not at all unique to Android.
So what happens is that the Timer tries to run its TimerTask and this in turn runs the update function, but using the thread the Timer runs on rather than the UI thread. Everything is fine until the last instruction of update, which attempts to use a method that belongs to an ImageView object and this it cannot do because it is not the UI thread. Hence the error message.
At this point many Android programmers give up and try a completely different approach. Some of these approaches do have advantages, see the Handler class for example for a good alternative. However, the Android framework provides a method for just such a situation:
runOnUiThread(Runnable)
This is a method of the Activity object and you can use it from any thread that has access to the Activity object's methods to run a function on the UI thread. If the thread using it happens to be the UI thread then no harm done, the function is just called. If it isn't the UI thread then the call will be deferred until the UI thread is available and then the function will be run. As always the function shouldn't keep the UI thread busy for too long or the UI will become sluggish or even freeze completely.
The Runnable is an Interface that has a single run method that is the function that is executed on the UI thread – this means it is a SAM (Single Abstract Method) and we can use a lambda to simplify the code:
This looks like a mess of nesting and curly braces, but you should be able to follow the logic.
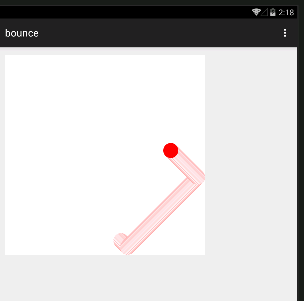
Now when you run the program you will see the red ball bounce slowly and smoothly around the screen. How good the animation is depends what you run it on. On the emulator is can be slow and irregular; on a real device it should be fine:
Animation complete with a trail to show how the ball moves
Now you know at least one way to allow a non-UI thread interact with the UI. There are so many ways to implement animation that this is just one of many starting points, but with an understanding of this one the others will seem easier. If you wanted to use this approach, the structure of this demonstration program could be improved. For example, the ball really should be a Ball class complete with its position and velocity properties and its update method. This way you gain the benefits of object-orientation and you can animate lots of balls around the screen with very little extra effort.
class MainActivity : AppCompatActivity() {
 private val width = 800
 private val height = 800
 private var x = 463f
 private var y = 743f
 private var vx = 1f

 private var vy = 1f

 private var r = 30f

 private val paint: Paint = Paint()

 private val b = Bitmap.createBitmap(width, height,
                         Bitmap.Config.ARGB_8888)
 private val c: Canvas = Canvas(b)
 fun update() {
   paint.color = Color.WHITE

   c.drawCircle(x, y, r, paint)
   x = x + vx
   y = y + vy
   if (x + r >= width) vx = -vx
   if (x - r <= 0) vx = -vx

   if (y + r >= height) vy = -vy

   if (y - r <= 0) vy = -vy

   paint.color = Color.RED

   c.drawCircle(x, y, r, paint)
   imageView.invalidate()

 }
There is so much to learn about graphics it is difficult to pick out things you need to know. If you want to find out more about how the standard UI works you need to look into the OnDraw event and how to create your own View object that render graphics. You need to find out about Android's vector graphics using shapes and path. You need to know about the different types of animation that are available and eventually you need to learn about OpenGL and its support for hardware accelerated 2D and 3D graphics.
Summary
This is the complete summary of Chapter 12: Beginning Bitmap Graphics. The topics in italics are not part of this extract which is taken from the end of the chapter.
The subject of Android graphics is huge and there is always more than one way to approach any task. This chapter is a first look at what you might call UI-based graphics.
The Bitmap is the basic graphics object. It consists of a rectangle of pixels that can be set to any color.
The ImageView is a general purpose UI component that can be used to display a range of graphics objects including a Bitmap.
You can draw on a Bitmap using a Canvas object which has a large number of different drawing methods.
The color and drawing style used by many of the Canvas methods is determined by the properties of a Paint object.
The Canvas object also supports transformations which can be used to modify where a graphic is drawn, its size, rotation, etc.
Transformations can be used to standardize the drawing of graphics objects at the origin.
Transformations can also be used to change the default pixel coordinate system to anything you want to use.
Simple animation is possible using nothing but a Bitmap, Canvas and an ImageView.
Only the UI thread can modify the UI.
The Android Timer can be used to animate 2D graphics, but you have ensure that it runs the code on the UI thread using the runOnUIThread method.
Android Programming In Kotlin Starting with an App