|
Page 1 of 3 As an example of building a simple app using the ConstraintLayout and the Layout Editor, let's build a Calculator App. Here's how to do it in Kotlin, in an extract from my published book Android Programming in Kotlin: Starting With An App.
Android Programming In Kotlin
Starting with an App
Covers Android Studio 3 and Constraint Layout.
Is now available as a print book:

Buy from: Amazon
Contents
- Getting Started With Android Studio 3
- The Activity And The UI
Extract: Activity & UI
- Building The UI and a Calculator App
Extract: A First App
- Android Events
- Basic Controls
Extract Basic Controls
Extract More Controls ***NEW!
- Layout Containers
Extract Layouts - LinearLayout
- The ConstraintLayout
Extract Bias & Chains
- Programming The UI
Extract Programming the UI
Extract Layouts and Autonaming Components
- Menus & The Action Bar
- Menus, Context & Popup
- Resources
Extract Conditional Resources
- Beginning Bitmap Graphics
Extract Animation
- Staying Alive! Lifecycle & State
Extract State Managment
- Spinners
- Pickers
- ListView And Adapters
-
Android The Kotlin Way
If you are interested in creating custom template also see:
Custom Projects In Android Studio

Some of the techniques used in this app are a little beyond what we have covered so far but you should be able to follow and it is time to show what something more than a single button app looks like.
Topics covered in the chapter but not included in this extract:
- What's in the Palette
- Positioning – the ConstraintLayout
- Sizing
- The Component Tree
- A Simple Button Example – Baseline Alignment
- Orientation and Resolution
- A First App – Simple Calculator
This is a very simple calculator - all it does is form a running sum. It has just ten numeric buttons and a display. It takes the values on each of the buttons and adds them to a running total. There are no operator buttons, add, subtract or clear – but you could add them to extend its functionality.
Start a new Basic Activity project called ICalc or whatever you want to call it. Accept all of the defaults.
The principle of operation is that we are going to set up a grid of ten buttons. Set each button to 0 through 9 as a text label. We are then going to assign the same onClick handler to each of the buttons. All it is going to do is retrieve the text caption showing on the button, convert it to an integer, add it to the running sum, and then store it back in the TextView after converting it back to a String.
Put simply, when a button is clicked the event handler is called which retrieves the button's label as a digit and adds it to the running total on display.
Code
So the code is fairly easy.
We need a private property to keep the running total in:
private var total = 0
Next we need an onButtonClick function which is going to be used to handle the onClick event for all of the buttons. Refer back to Chapter 2 if you don't know about simple event handling.
The button that the user clicks is passed as a View object as the only argument to the function and we can use this to get its text caption:
    fun onButtonClick(v: View) {
        val button = v as Button
        val bText = button.text.toString()
Now that we have the button's caption, 0, 1, 2 and so on, we can convert it to an integer and add it to the running total:
  	val value = bText.toInt()
       total += value
Finally we set the TextView’s text property to the total converted to a String:
       textView.text= total.toString()
}
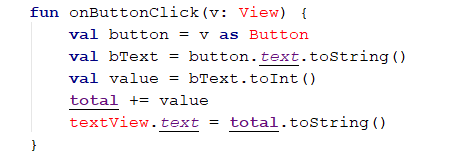
The complete event handler is:
private var total = 0
fun onButtonClick(v: View){
    val button=v as Button
    val bText=button.text.toString()
    val value=bText.toInt()
    total+=value
    textView.text= total.toString()
}
Put this code within the MainActivity class as one of its methods, for example right at the end just before the final closing }.
When you enter this code you will see many of the classes and methods in red:

This is because they need to be imported to be used by the project. You can do this manually, adding the necessary import statements at the start of the file, but it is much easier to place the cursor into each one of the symbols in red and press Alt+Enter and select Import Class if necessary. This should be becoming second nature by now.
Notice that the error flagged in textView cannot be cleared – it is a real error. We haven't as yet defined the UI and textView doesn't exist. It will once we create the UI, so for the moment ignore the error.
|


