| Micro:bit Getting Started With C/C++ |
| Written by Harry Fairhead | |||||
| Monday, 05 September 2022 | |||||
Page 2 of 4
VS CodeBoth V1 and V2 templates use Cmake for build configuration and this means you can use any IDE that has Cmake support. In the first edition of this book the IDE of choice was NetBeans and this still works, but Visual Studio Code, VS Code, is now a better choice. It has good Cmake support and its popularity means it has a vibrant community. Install VS Code, from https://code.visualstudio.com/, and install the Microsoft C/C++ extension and the Cmake extension.
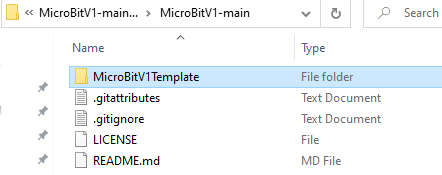
Hello World For Micro:bit V1Assuming that you have set up the prerequisites explained in the previous section, you can quickly move on to creating your first micro:bit V1 application. First go to: https://github.com/I-Programmer-info/MicroBitV1 and download a zip (if you use GitHub you can also clone the repository). Once you have the zip file you can unzip it and extract the folder M
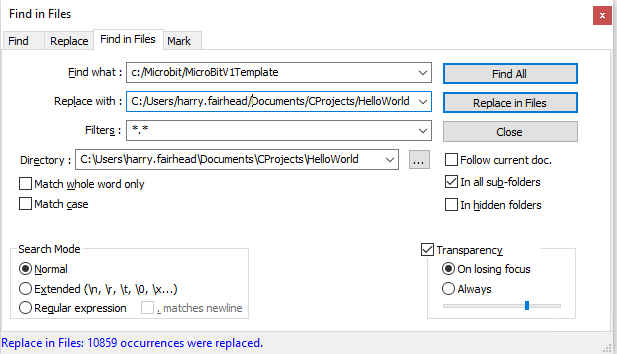
It doesn’t matter where you store the folder, but there are advantages to keeping the path simple as will become clear. For example, I copied it to a CProjects directory in my home directory: C:\Users\harry.fairhead\Documents\CProjects\ Once you have copied the template you can change the name of the folder to something more appropriate for the project or copy it and rename it. In this case change the name of the folder “MicroBitV1Template” to “HelloWorld”. The next problem is that we have to change all of the absolute paths used in the Cmake files. The obvious solution would be to convert all the paths to relative paths, but this turns out to be very difficult to do as there are more than 10,000 occurrences of the absolute path in several different types of files. While it would be possible to modify the Cmake configuration to use relative paths, or indeed to create a completely new Cmake configuration that works more appropriately, this is a poor investment of time. A quicker solution, although it is undoubtedly a “hack”, is to use a file replace option to edit the incorrect absolute paths to correct absolute paths. That is, our task is to change: c:/Microbit/MicroBitV1Template into whatever the new path is. In my case the new path is: C:\Users\harry.fairhead\Documents\CProjects\HelloWorld There are various ways to make a change to a batch of files. VS Code will do the job, but not entirely reliably. NotePad++ is much more accurate and if you haven’t installed NotePad++ do because it is generally useful. If you don’t want to use NotePad++ you can use any text processor/editor that can make a change to a set of files without changing their encoding. If you use NotePad++ the command is Search,Find in Files and you should fill the dialog box in something like:
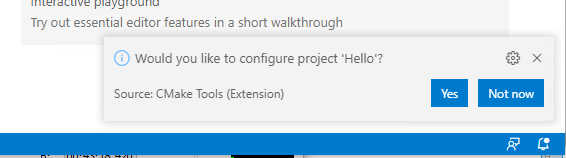
Notice the orientation of the path separators. Cmake works best with Unix/Linux path separators but Windows works best with Windows path separators. You can see from the dialog box that 10,859 absolute paths are replaced, but this might change as files/folders are modified in the repo. If you want to change the project name, which modifies the names of the compiled files including the hex files, then edit: build\bbc-microbit-classic-gcc\CMakeLists.txt and change line 74 to read: project(HelloWorld) Now you can load the project into VS Code or any IDE that can work with Cmake. Open a new VS Code window and load the HelloWorld folder. It should be recognized as a C/C++ Cmake program. If VS Code offers to configure the project then the best answer is to select Not now. If it does configure the project you may have to do a clean reconfigure and clean build to get things working.
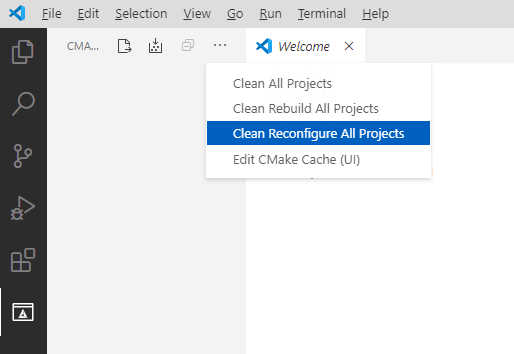
No matter what happens, your next manual task is to select the Cmake extension and then select Clean Reconfigure All Projects
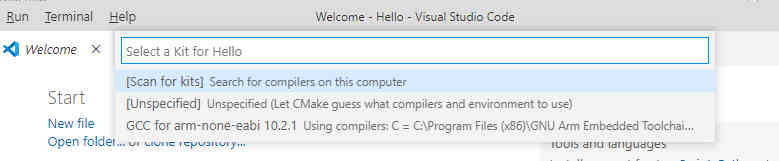
As this is the first time to configure the project you will be asked to select a “kit”. Essentially a kit is a compiler collection that can be used to build the project. If you have installed GCC you should see it in the list – if you don’t see it then use the Scan for kits option. If you still don’t see it check that it is installed and on the path.
|
|||||
| Last Updated ( Monday, 05 September 2022 ) |
 You can also activate GitHub as your source control manager, but if you don’t already know GitHub it is simpler not to. Resources for learning about GitHub are included on this book’s webpage at www.iopress.info.