Micro:bit Getting Started With C/C++
Written by Harry Fairhead   
Monday, 05 September 2022
Article Index
Micro:bit Getting Started With C/C++
VS Code
Hello World
Blinky

Your First Program - Blinky

The time has come to run your first program and deal with some details of using VS Code.

You can use either the V1 or V2 development environment and hence target either version of the micro:bit. It is assumed that you have set up a project called BlinkyV1 or BlinkyV2 following the instructions given earlier. Load the project into VS Code and do a clean configure and a clean rebuild. Next, delete all of the source files in the source directory, which is in the project root for both versions. Create a new file called main.cpp, or simply copy the code into the existing file, containing the following code:

#include "MicroBit.h" 
MicroBit uBit;
int main() {
uBit.init();
uBit.display.setDisplayMode(DISPLAY_MODE_GREYSCALE);
for (;;) {
uBit.display.image.setPixelValue(2, 2, 255);
uBit.sleep(1000);
uBit.display.image.setPixelValue(2, 2, 0);
uBit.sleep(1000);
}
}

Exactly the same code will work with the V1 or the V2 micro:bit. Do a clean reconfigure and a clean rebuild of the project. As usual you will see a lot of warnings scroll past for the V1 compile, but the build should finish without errors.

You will find the generated hex files in \BlinkyV1\build\source for the V1 program and the file that you want to download is BlinkyV1-combined.hex.

For the V2 program you will find the hex file in the project root and it is called MICROBIT.hex.

If you have set the templates up correctly, you should see the middle LED in the display flash at 1 second intervals. Notice that if you simply change the main program, or make minor changes to any program in the project, you should only need to do a build and not a clean build.

Everything should work as advertised, including IntelliSense, auto-complete and error flagging. If not make sure that the.vscode\c_cpp_properties.json file contains the line:

"compileCommands": "${workspaceFolder}/build/compile_commands.json",

Universal Hex

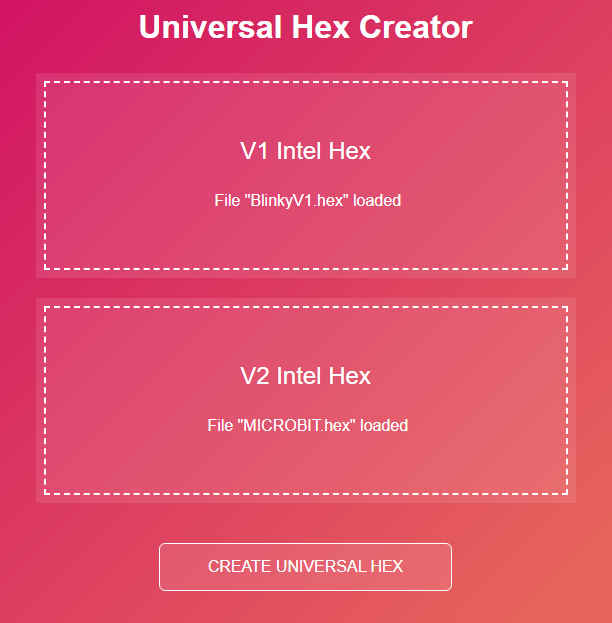
Assuming that you have built both the Blinky program for V1 and V2, we can create a universal hex file that can be loaded into either version of the micro:bit. The simplest way of doing this is to go to the web page:

https://tech.microbit.org/software/universal-hex-creator/

and drag and drop the appropriate hex files:

start16

Notice that these have to be the Intel hex files and not the combined file produced for the V1 microbit.

When you click the create universal hex button you are asked to provide a location for the file. Once downloaded you can drag and drop the hex file into either a V1 or a V2 micro:bit and it will work.

Summary


  • The split between the V1 and V2 versions of the micro:bit is problematic. The V1 is a deprecated mbed device and the V2 has abandoned the use of the mbed software.

  • The micro:bit V1 build system is based on Yotta, a program created for the mbed project. While it is still supported, it is better to base as little as possible on its use.

  • Both V1 and V2 projects can be treated as Cmake projects and this makes the minimal prerequisites very similar for both. You need the ARM cross compiler together with Cmake and Ninja or make in some cases.

  • You can use any Cmake-supporting IDE to work with projects, but VS Code is well suited and recommended.

  • For a V1 project you can download and install Yotta and create the files and folders needed. A simpler way to get started is to download the template provided at the I Programmer GitHub repository.

  • Although V2 projects are somewhat simpler, the quickest way to get started is to download the V2 template from the I Programmer GitHub repository.

  • The result of compiling a V1 or a V2 project is a hex file created by srecord which can be copied to the micro:bit via the USB connection.

  • Each hex file only works on the type of micro:bit it is created for. A new universal hex file can be created which combines both types of hex file into one.


Micro:bit IoT In C Second Edition

By Harry Fairhead

microbite2360

Buy from Amazon.

Contents

  1. The Micro:bit Family
  2. Getting Started With C/C++ ***NEW!
  3. First Steps With The GPIO
  4. Fast Memory-Mapped GPIO
  5. Pulse Width Modulation, Servos and More
    Extract: Micro:bit - Basic PWM
  6. I2C Bus
  7. I2C Measuring Temperature And Humidity
  8. Creating A Custom Protocol
  9. DS18B20 1-Wire Temperature Sensor
  10. SPI Bus
  11. A‑to‑D With The SPI Bus
  12. Serial Connections
  13. Getting On WiFi
  14. The LED Display
  15. Radio Sounds
    Extract: Morse Transmitter
  16. Appendix I The Mbed Online Compiler
  17. Appendix II Yotta And Offline Development

 <ASIN:1871962676>

<ASIN:B08XPRMK97>

To be informed about new articles on I Programmer, sign up for our weekly newsletter, subscribe to the RSS feed and follow us on Twitter, Facebook or Linkedin.

Banner


Remembering Grace Hopper On Her 114th Anniversary
09/12/2024

Today sees the start of Computer Science Education Week and  the 2024 Hour of Code. These educational event are timed to coincide with Grace Hopper's birthday on January 9th, 1906 due to her conc [ ... ]


Lightbend Announces Akka 3
15/11/2024

Lightbend, the company that developed Akka, has announced Akka 3, and has changed its name to Akka. The company produces cloud-native microservices frameworks, and Akka is used for building distribute [ ... ]


More News

espbook


Comments


or email your comment to: comments@i-programmer.info

<ASIN:B08WTBNJ5Q>

<ASIN:B08NLX7773>


Last Updated ( Monday, 05 September 2022 )