| Setting Up Site-To-Site OpenVPN |
| Written by Sam James | |||||
| Monday, 30 August 2021 | |||||
Page 1 of 4 Setting up a point-to-point VPN is relatively easy but site-to-site is much more complicated involving certificates and more IP addresses than you can count. Find out how to do it using OpenVPN. The simplest form of VPN is where you have a server that connects individual users to the local network. The user on another network has to sign in, often with a password to the VPN server and if successful the VPN makes it look as if they are just another machine on the network that the server is part of. This is useful but sometime you would be better connecting the whole of the remote and local network to make it look as if it was all just one big network with no distinctions between machines connected to either network. In this case all of the remote network traffic is passed to the local network. This is clearly more powerful and trouble free as each user on the remote networks doesn't have to sign in to make use of the local network. 
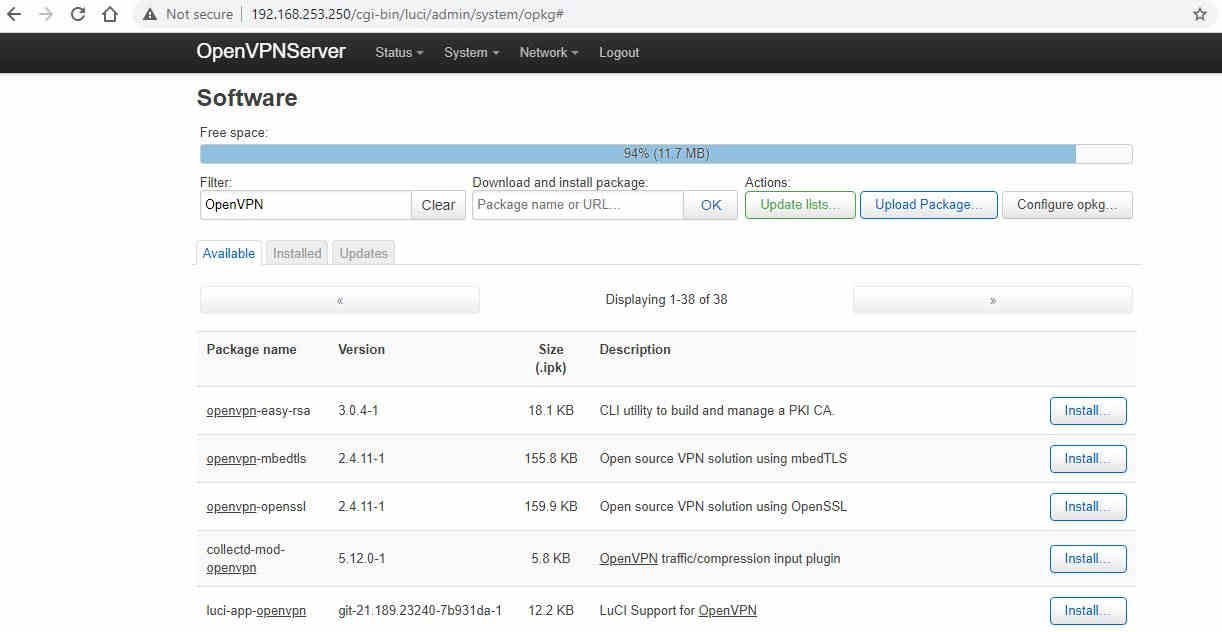
The HardwareAlthough this procedure will work with any OpenVPN supporting routers for added realism we will use two Asus routers. Also all of the IP addresses can be varied from those quoted. At the start we have two Asus routers with a clean install of the OpenWRT wireless router software on them. One router will run the OpenVPN server and run a local LAN on the IP address 192.168.31.0/24. The other will run the client and have a local LAN of 192.168.8.0/24. We will attempt to refer to these in terms that can be understood, but these IPs are the ones used in the code and in screenshots. For clarity, in screenshots we’ve changed the host names of the routers to OpenVPNServer and OpenVPNClient respectively. We have also left the routes with the default user as root with no password. Remember to set a password on your setup before deploying your routers. In order to log into both routers it can be useful to have Wi-Fi connection set up on both and to connect to whichever one you are wanting to make setting on. If you are a home user it is likely you will want to have your server router as your main home router and then plug the WAN port of the client router into the LAN of the server (main) router until everything is set up. Also, it is worth mentioning that for the purpose of this article both routers are running inside another local network with IP address 192.168.253.0/24, which will be treated as the WAN. This means that the server will have the external IP of 192.168.253.250 and the client 192.168.253.251. In practice, these would be the IPs asigned by the WAN. There are two ways to get most things done with OpenWRT - you can SSH into the router and do everything on the command line or you can configure everything through a web browser and GUI called LuCI. First we will need to install OpenVPN on our routers, to do this we can use the built-in package manager, opkg. From the command line we run: opkg update to first update the list of available packages and then install OpenVPN with Openssl support. From a web browser and LuCI select System→Software from the top menu bar, then click the “Update lists…” to get the list of current packages. It is then easy to search for “OpenVPN” in the filter box and click the install button:
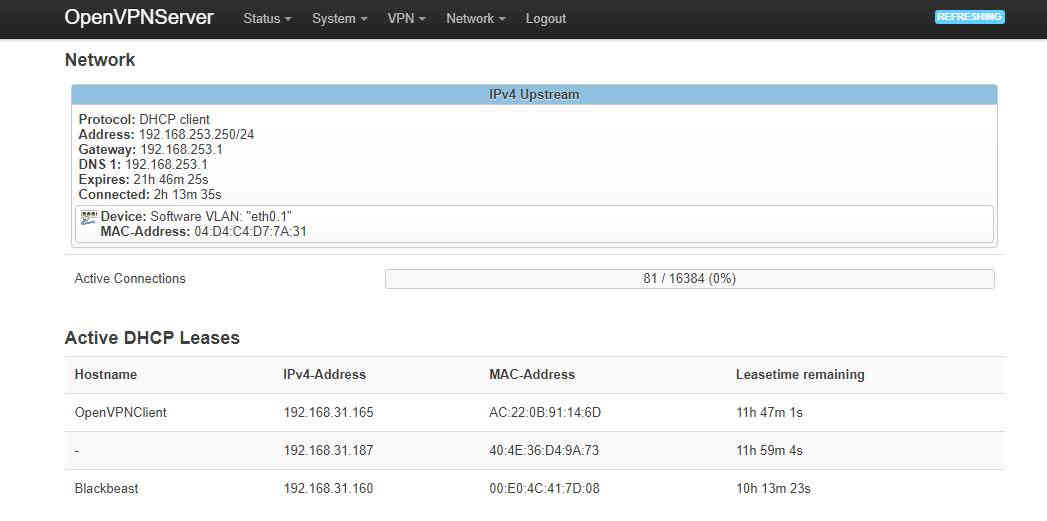
From the above screenshot we can see a number of other packages available. On both the server and the client the package luci-app-openvpn will also need to be installed if you want to manage your VPN with the LuCI GUI. For the server we will use openvpn-easy-rsa to create and manage the cryptographic certificates we need to create, so that will need to be installed on the server. On LuCI simply click the install button as appropriate, from the command line: opkg install luci-app-openvpn (do this on both server and client, if needed) opkg install openvpn-easy-rsa (this should only be needed on the server) Finally the default text editor available when SSH into OpenWRT is VI. Personally I prefer Nano, which is also available via: opkg install nano Feel free to use VI if you wish. Creating the Cryptographic Certificates for the ServerA note about securityThis how-to is meant to get something working quickly and explain as much of the basics as possible. We will not spend a lot of time making sure our system is 100% bullet proof against any foreign agent wishing us harm. Once your system is working you may spend as many hours as you like making sure that the only way someone is getting past your security is with hours of supercomputing time. We will, where possible, point out the flaws in this initial setup. First we need to create the Public Key Infrastructure (PKI). For our set up we will create all the necessary certificates on the router acting as the VPN server and then assume that we can securely transfer these file to the client router. We will use the Easy-RSA to create a Public Key Infrastructure, this can’t be done with the LuCI GUI so we need to SSH into the server to get started. Easy-RSA is configured with a file called vars located in etc/easy-rsa/vars. The only setting worth modifying is the location of the PKI which is set with set_var EASYRSA_PKI. Open the vars file with: nano /etc/easy-rsa/vars you should find a line in this file: #set_var EASYRSA_PKI "$PWD/pki" we would like to uncomment this and rewrite it: set_var EASYRSA_PKI "/etc/easy-rsa/pki" close the file and save the changes. Next we will initialize the PKI directory: easyrsa init-pki You’ll get a warning that you're about to erase everything in the PKI directory, confirm and continue to creating the Certificate Authority (CA): easyrsa build-ca nopass Here the nopass suppresses the need for a password on the certificate. You’ll be asked for a Common Name for your CA. We won’t be using this later so any unique name can be used, think of it as naming of your VPN server. Next we need to create certificates for the Server and Client: easyrsa build-server-full server nopass easyrsa build-client-full client nopass Finally we need to Generate the Diffie Hellman (DH) parameters: easyrsa gen-dh Creating the DH parameters takes a long time. You can take a break and let your router do some calculations or we can use this time to copying the necessary files from the server to the client, at least my router was able to both at once. The client will need the following files from the server: /etc/easy-rsa/pki/ca.crt /etc/easy-rsa/pki/issued/client.crt /etc/easy-rsa/pki/private/client.key The easiest way of copying these files is having both routers in the same physical space. It is possible to plug the WAN port of the client router into the LAN ports of the server router. The server will issue the client an IP address then we can use secure copy pasted (SCP) to transfer the files. Looking at the LuCI on the server route, selecting Status from the top menu, let us see the IP address assigned to the client:
As we can see, OpenVPNClient is on 192.168.31.165. We can open a new SSH session leaving our old one still giving the readout of the gen-dh command. Then we can copy the files with: scp /etc/easy-rsa/pki/ca.crt root@192.168.31.165:/etc/openvpn/
scp /etc/easy-rsa/pki/issued/client.crt root@192.168.31.165:/etc/openvpn/
scp /etc/easy-rsa/pki/private/client.key root@192.168.31.165:/etc/openvpn/ You should change the IP address appropriately and we are choosing to transfer these files to the /etc/openvpn/ directory that is created when we installed OpenVPN. You can now move the WAN port of the client to its normal configuration. |
|||||
| Last Updated ( Monday, 30 August 2021 ) |