| Getting started with Windows 7 Gadgets |
| Written by Ian Elliot | |||||||||
| Monday, 22 August 2011 | |||||||||
Page 5 of 5
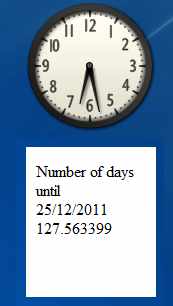
The main windowThe main Gadget HTML is fairly simple but with the addition of two new features - some date manipulation and an auto-refresh. The first thing we need to do is to set up the Settings window: <html> To make the Gadget auto-update we need to make use of the main window's Timer function. This can be set to run a specified function at a set interval, repeatedly, or just once. The window onload event handler is a good place to set up the timer: var Timer; This specifies that the getTime() function should be called every 10,000 milliseconds i.e. every 10 seconds. You can adjust the refresh time to suit your particular application. Although not used in this Gadget, the setInterval function returns a code that identifies the timer that has been created. This code can be used by other functions to start, stop and change the time interval so it's worth storing in a global variable - in this case it's stored in Timer. The getTime function does the actual work of retrieving the target date, retrieving the current date, finding the difference between the two and then displaying a reasonably formatted display of the result. Retrieving the target date is easy: getTime=function() We only want to do any work if the target has been defined by the user: if(Event!="") If the Event is defined then it contains a date and time formatted string that can be used to create a JavaScript date object: var d=new Date(Event); Later on we are going to also need a string formatted as a simple date i.e. dd/mm/yyy and this can be constructed using the date object: target=d.getDate()+"/" Getting the current date is just a matter of using the default date object constructor: var Now=new Date(); The getTime method returns the number of milliseconds since Midnight on the 1st January 1970. Most date arithmetic in JavaScript is easier to do by working in milliseconds and then converting to whatever time/date units we really want to work with. In this case we simply subtract the two dates in milliseconds since the start of 1970: var diff=d.getTime()-Now.getTime(); To convert this to number of days we divide by 1000 to give seconds, 60 to give minutes, 60 to give hours and finally by 24 to give days: diff=diff/1000/60/60/24; Notice this gives a result that is in days and fractional days. If you want to convert to days and hours, say, then you would need to truncate the result to an integer and convert the fractional day into hours, minutes and seconds. Not difficult but potentially confusing. In this example we simply round the result to six significant digits: diff=Math.round(diff*1000000)/1000000; Now we are ready to display the result. We could use a text box or some other display control but we can also enter text directly into the HTML of the web page. The easiest way to do this is to use a <div> or a <span> pair of tags complete with an id that can be retrieved using the DOM getElementById function. Notice that if you are going to get very far with Gadgets or JavaScript/HTML in general you are going to have to master the use of the DOM. In this case we assume that there is a tag with id="Display". The getElementById method returns the DOM object corresponding to the tags and the .innerHTML property allows us to enter any HTML we care to between the tags: System.Gadget.document. In this case the target date and the number of days to the target are separated by a line break. You could include additional HTML formatting tags such as <b> or <h1> etc. to make the text stand out. Finally all that remains is the body of the page: <body style="width:130; height:150"> You can see the pair of <div> tags with the id Display defining where the date information will appear on the page along with some additional text and formatting. It really is this simple. The complete listing is: <html> As long as you have stored everything in the correct directory and given everything the correct names you should now be able to load your gadget, set a target date and watch as the countdown proceeds. Of course there is lots of scope for making the user interface look more exciting - a background picture, an icon and some colour would make an immediate impression - but this is just standard web page design. Notice that you can use the debug window function to find out what is happening within timer interrupts but you have to be careful because the debug window will be recreated each time the event handler is called and this can be very confusing.
Advanced GadgetsAs long as you know about HTML, the DOM and scripting then the only thing you need to concentrate on is the new API. It is worth mentioning, however, that many of the Windows scripting APIs and ActiveX objects are still available for you to use and you shouldn't forget about old favourites such as the WMI API. You also need to think in terms of Ajax and the HTTPRequest object to see how you might go about downloading live data from the Internet. The new API introduces many useful new objects and functions but these are mainly about giving a web page script access to the local machine - much of the work of a Gadget is achieved using nothing really new. If you would like the code for this project then register and click on CodeBin. Coming soon: Building a timer gadget

var Timer; |
|||||||||
| Last Updated ( Monday, 22 August 2011 ) |